
Two main methods are available for installing OpenFOAM-v2412 on your computer: installing from source-pack, installing from pre-built binaries. The first method, is the most portable and of-course requires more steps and proficiency to accomplish, but the second method is easier, but may not work on some versions of Ubuntu.
For Windows installation, it is recommended to install OpenFOAM on Windows 10 or above. There are three different ways to install OpenFOAM on windows. Here, we are introducing the most natural way and straight forward one: windows subsystem for Linux (WSL2). Just follow the instructions given in this page and then come back here to install OpenFOAM-v2412 using one of the following methods. So, for installing OpenFOAM on windows you need to follow these steps:
- Install WSL2 on your windows OS (see this page)
- Install one distribution of Linux/Ubuntu on it.
- Install OpenFOAM-v2412 using one of the following methods that described below.
1. Installing OpenFOAM-v2412 from source pack
This installation procedure works on Ubuntu 20.04 LTS, 22.04 LTS and 24.04 LTS versions. The same procedure is also applicable for other versions of Ubuntu or even other Distros of Linux, but the prerequisites with proper version should be installed on the operating system first.
Read this if you want to install it on other distros of Linux: OpenFOAM requires a proper version of gcc (mostly 7.5.0 or above), a compiler with full functionality of C++17 features. A proper version of OpenMPI (versions 2.1.x, 3.1.x, 4.x), cmake (version 3.8 or above for installing CGAL and paraview), boost (version 1.48 or above) and etc. Please refer to this page for more details.
1.A) Installing prerequisites
Before you start installing OpenFOAM-v2412, you need to install some packages. Some of these packages may already be installed on your system. Enter the following commands in the terminal and confirm the operation when required.
sudo apt-get update
sudo apt-get install build-essential autoconf autotools-dev cmake gawk gnuplot
sudo apt-get install flex libfl-dev libreadline-dev zlib1g-dev openmpi-bin libopenmpi-dev mpi-default-bin mpi-default-dev
sudo apt-get install libgmp-dev libmpfr-dev libmpc-dev
OpenFOAM-v2412 relies on some other third party packages like boost, scotch, fftw, etc. You can install these packages through ThirdParty folder. However, there is an option to skip this step and install these components directly on you system using this command. So, if you want to skip ThirdParty installation, perform this step.
sudo apt-get install libfftw3-dev libscotch-dev libptscotch-dev libboost-system-dev libboost-thread-dev libcgal-dev
Important Note: Installing components through ThirdParty folder is the most portable way to install OpenFOAM. So, It is recommended to use this method.
1.B) Getting the source code
You first need to create a directory on the home folder. Open a new terminal and execute these commands to perform these commands:
cd ~
mkdir OpenFOAM
cd OpenFOAM
Note1: if you already have this folder (OpenFOAM) on the home directory, you may skip mkdir step.
Note2: You can install OpenFOAM in other locations on your computer. But this instruction assumes that you are installing it on your the home folder under OpenFOAM folder.
Get the source code from openfoam.com (official source code) website. When the current directory in the terminal is $HOME/OpenFOAM, execute the following commands to download the compressed files and to unzip them on the OpenFOAM directory.
wget -O -  http://dl.openfoam.com/source/v2412/OpenFOAM-v2412.tgz | tar xvz
wget -O -  http://dl.openfoam.com/source/v2412/ThirdParty-v2412.tgz | tar xvz
If wget fails to establish the connection, you need to download it manually from openfoam.com and unzip the files in the OpenFOAM folder.
Other useful links to download documents that you may want to have:
1.C) Setting the Env. Variables
You need to introduce the file that contains the env. variables of OpenFOAM to system. Add the following command to the .bashrc file of your system and then source it.
nano ~/.bashrc
Then add this line to the end of this file, save it and exit.
alias of24="source $HOME/OpenFOAM/OpenFOAM-v2412/etc/bashrc"
And in the same terminal execute this command to source the bashrc file.
source ~/.bashrc
of24
Now, env. variables of OpenFOAM are introduced to your system and you can proceed to installation.
1.D) Installing ThirdParty-v2412 and OpenFOAM-v2412
To install third-party packages, just open a new terminal and execute the following commands:
of24
cd ~/OpenFOAM/ThirdParty-v2412
./Allwmake -j
after finishing this step, you are ready to install OpenFOAM. In the same terminal execute the following commands:
cd ~/OpenFOAM/OpenFOAM-v2412
./Allwmake -j
This may take several minutes. Just wait until the end of compilation and installation.
1.E) Testing the Installation
Open a new terminal and execute the following commands:
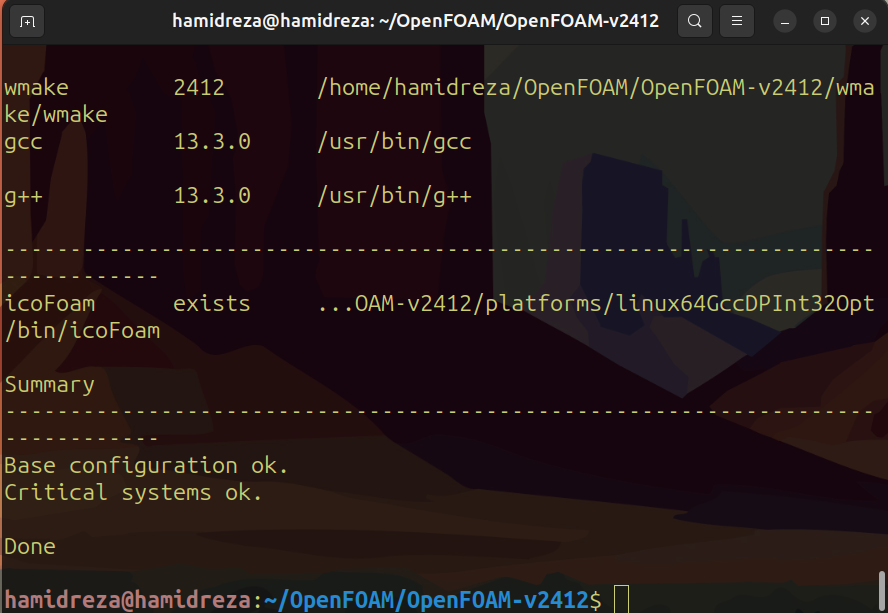
of24
foamInstallationTest
And you will get an output similar to this.
2. Installing OpenFOAM-v2412 form pre-built binaries
This procedure works on Ubuntu-22.04 LTS and 24.04 LTS and it has not been tested for other versions. The process of installation is very simple. Just open a new terminal and enter the following commands.
curl https://dl.openfoam.com/add-debian-repo.sh | sudo bash
sudo apt-get update
sudo apt-get install openfoam2406-default
After installation, you will be able to run OpenFOAM executable (perform simulations) by executing this command in each new terminal that you open (it activates the env. variables).
openfoam2406