PhasicFlow is an open-source code for performing DEM and CFD-DEM simulations. PhasicFlow can be built for CPU or GPU execution, and you can maintain multiple builds on your system. This guide covers installing a single build of PhasicFlow v1.0 on Ubuntu 22.04 LTS and Ubuntu 24.04 LTS. Installing PhasicFlow on older versions of Ubuntu is also possible, but it requires additional efforts to provide the dependencies.
For Windows installation, you need to have Windows 10 or higher. You first need to install WSL2 (Windows Sub-system for Linux) on your OS and then install one of the official supported distributions of Ubuntu on it. Thereafter, you can follow the instructions given here to install PhasicFlow on your Windows OS. If you want to learn on how you can install WSL2 on your computer, see this page. There is no limit on the type of installation you want to have on this machine. You can have Serial, OpenMP or Cuda installation on your Windows OS.
Prerequisites
Before you begin, ensure you have the following packages installed:
- git: For cloning the source code and package management.
- g++: For compiling the C++ code.
- cmake: For generating the build system.
- Cuda 12.x or above: For compiling the code with cuda.
Installing Required Packages (Except CUDA)
Open your terminal and run the following commands:
sudo apt update
sudo apt install -y git g++ cmake cmake-qt-gui
Note: The tbb library will be installed automatically as a dependency.
Installing CUDA (For GPU Builds)
If you plan to use PhasicFlow with an NVIDIA GPU, you must install CUDA. Ensure you install a version compatible with your hardware and Ubuntu version (12.x or later). Refer to NVIDIA’s official documentation for CUDA installation instructions.
Building PhasicFlow
Follow these steps to build PhasicFlow:
Step#1: Package Check
Verify that all required packages are installed.
Step#2: Cloning the Source Code
Create a PhasicFlow directory in your home folder:
cd ~
mkdir PhasicFlow
cd PhasicFlow
Clone the PhasicFlow repository:
git clone https://github.com/PhasicFlow/phasicFlow.git
mv phasicFlow phasicFlow-v-1.0
Step#3: Setting Environmental Variables
Open your ~/.bashrc file using a text editor (e.g., gedit, or nano):
nano ~/.bashrc
Add the following line to the end of the file:
source $HOME/PhasicFlow/phasicFlow-v-1.0/cmake/bashrc
Save and close the file. To apply the changes in your current terminal, run:
source ~/.bashrc
Alternatively, close and reopen your terminal.
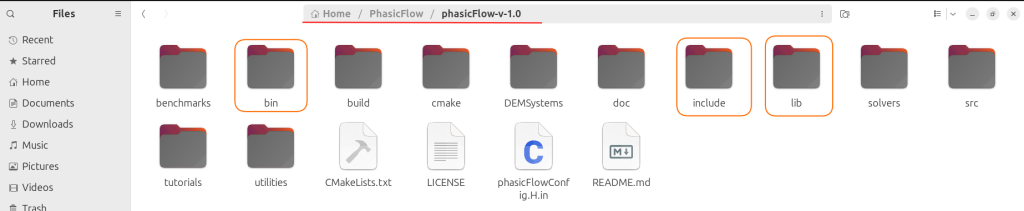
After this step the folder structure on your computer should look like this (Note that you may not see PhasicFlow-coupling folder on your computer):

Step#4: Building PhasicFlow
You can chose one of the execution modes for building PhasicFlow. Choose one of the following build options:
Serial Build (CPU)
cd ~/PhasicFlow/phasicFlow-v-1.0
mkdir build
cd build
cmake ../ -DpFlow_Build_Serial=On -DCMAKE_BUILD_TYPE=Release
make install
OpenMP Build (CPU)
cd ~/PhasicFlow/phasicFlow-v-1.0
mkdir build
cd build
cmake ../ -DpFlow_Build_OpenMP=On -DCMAKE_BUILD_TYPE=Release
make install
GPU Build (CUDA)
Note that you need to execute the command starting with cmake two times to have the right effect.
cd ~/PhasicFlow/phasicFlow-v-1.0
mkdir build
cd build
cmake ../ -DpFlow_Build_Cuda=On -DCMAKE_BUILD_TYPE=Release
cmake ../ -DpFlow_Build_Cuda=On -DCMAKE_BUILD_TYPE=Release
make install
After building, bin, include, and lib folders will be created in ~/PhasicFlow/phasicFlow-v-1.0/.
Note 1: For faster builds, use make install -j to utilize all CPU cores.
Note 2: For parallel builds, ensure you have sufficient RAM (1GB per CPU core/thread). You can limit the number of cores used with make install -j<number>, e.g., make install -j3.
Note 3: PhasicFlow uses double-precision floating-point numbers by default. To use single-precision (float), add -DpFlow_Build_Double=Off to the cmake command, e.g., cmake ../ -DpFlow_Build_Cuda=On -DpFlow_Build_Double=Off.
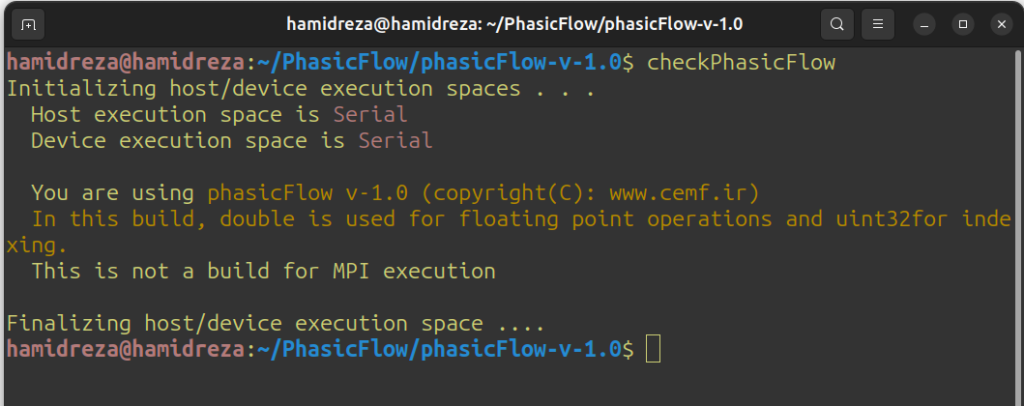
Step 5: Testing the Installation
Run the following command in your terminal:
checkPhasicFlow
A successful installation will display host/device environment information and the PhasicFlow version.